The flow editor
How to build and change a flow on the canvas: add steps from the block library, connect branches, edit a step in the side panel, then save a draft or publish.
On this page 7
Every flow opens in the same editor, whether it comes from a recipe or you built it yourself. Go to Flows and click the flow's name in Your flows.
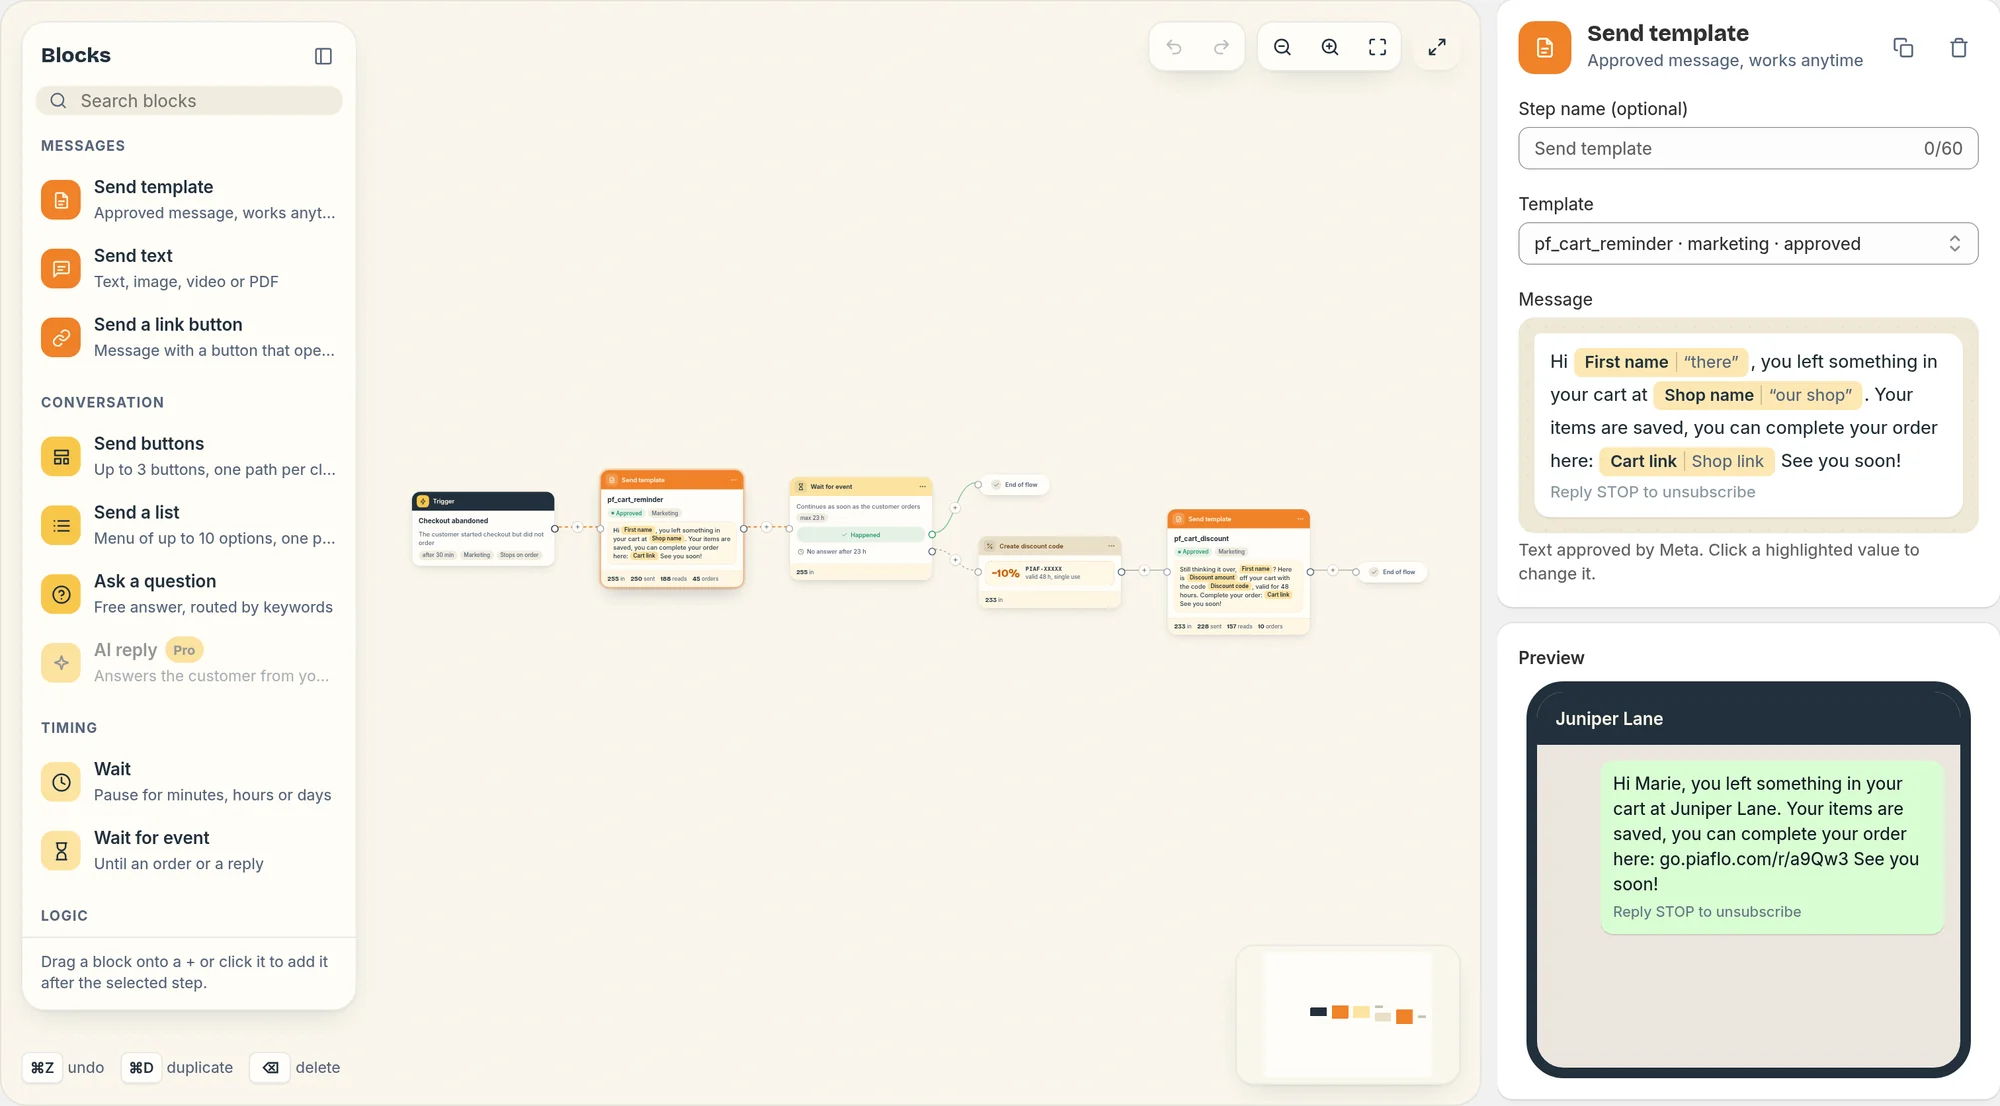
The three areas
- Blocks, on the left: every step you can add, grouped into Messages, Conversation, Timing, Logic, Shopify and Team. Type in Search blocks to find one. A block that needs a higher plan shows the plan name and cannot be added.
- The canvas, in the middle: the trigger card, then each step as a card, linked by connections. Steps with several outcomes (buttons, conditions, waits for an event) show one row per branch.
- The side panel, on the right: the settings of what you selected. With nothing selected, or the trigger selected, it shows Flow settings: name, trigger and who the flow reaches. See Triggers.
Create a custom flow
- On the Flows page, click Create custom flow.
- Enter a Name and choose a Trigger.
- Click Create.
The new flow starts with the trigger connected to an End step, as a draft. Custom flows need the Starter plan, which includes 3. Growth and Pro have no limit. When you have reached your limit, the button is disabled.
Add a step
There are several ways, use the one you prefer:
- Drag a block from the library onto a + on the canvas.
- Click a block in the library: it is added after the selected step.
- Click a + at the end of a step or a branch: a search box asks What happens next?. Type a few letters, then press Enter or click a block.
- Click the + in the middle of a connection (Insert a step here) to add a step between two others.
- In the side panel, use Add a step after: choose the Branch if the step has several, the Step, then click Add step.
New branches end with an End step by default, so the flow stays valid while you build.
Edit, connect and remove
- Edit a step: click it. The side panel shows its settings, the problems to fix and, for messages, a Preview of what the customer sees. You can give the step a name with Step name (optional): it shows on the card and in the report.
- Reconnect a branch: drag from the dot on the right of a step or branch to another step. A branch has only one next step, so the new connection replaces the old one.
- Remove a connection: select it and click Remove this connection, or press Delete.
- Duplicate or delete a step: use the ... menu on the card, or the icons at the top of the side panel. When you delete a step, the step before it is linked to the step after it.
Shortcuts, when you are not typing in a field:
| Keys | Action |
|---|---|
| ⌘Z or Ctrl+Z | Undo |
| ⌘⇧Z, ⌘Y or Ctrl+Y | Redo |
| ⌘D or Ctrl+D | Duplicate the selected step |
| Delete or Backspace | Delete the selected step or connection |
| Escape | Close the picker, then deselect |
The toolbar also has Zoom out, Zoom in, Fit to screen and Full screen.
Errors and warnings
Piaflo checks the flow as you edit. A step with a problem shows an alert icon, and the toolbar counts the errors, for example "2 to fix". Click it to jump to the first one.
- Errors block publishing. For example: "This step has no next step.", "The trigger is not connected to any step.", "Choose a template.", or a free text message placed where the customer has not written to you in the last 24 hours.
- Warnings do not block. For example: "This step can never be reached." or "Template awaiting Meta approval. Messages will wait until it is approved."
Save and publish
As soon as you change something, Shopify's save bar appears at the top.
- Save draft keeps your changes. Customers keep receiving the live version.
- Discard goes back to the last saved version.
- Publish (Republish on a live flow with no pending change) checks the flow, saves it and makes it the live version. The button stays disabled while errors remain.
- Pause stops new customers from entering. To turn the flow back on, click Activate in Your flows, or publish it again.
Customers already in the flow finish on the version they started with. See How flows work.
Plan limits in the editor
- Free: you can edit the recipe flows, with one message per flow and the Order created or Order shipped trigger.
- A/B split needs the Growth plan, AI reply the Pro plan.
- Results on each step of the canvas (in, sent, reads, replies, orders) show on the Growth and Pro plans.
 Still stuck? Write to us with the flow name or the order number involved.